
As with any historically-based camping hobby, there's a variety of camping gear that one can build or purchase. Unlike earlier periods, such as Revolutionary War or Civil War reenacting, large amounts of camping gear IS historically accurate. The advent of the automobile made it possible for more gear to be carried. This is not to say that there weren't people who packed light. The book "Motor Camping" by J.C. and John D. Long, published in 1923, describes several methods of motor camping, from simply putting a bedroll, a skillet and a knife in the backseat of a "flivver" (A flivver is a cheap, beater car, often a decade old or more.) to comfortable auto-tent accessories, and even to pulling a large camping trailer loaded with every luxury. In this post, we'll look at some of the things that will be needed and discuss a few options. Settle in. This might be a long one!
1) Shelter:

There are a lot of options for covering your head. Obviously, if you have a motor car, you have a sort of shelter with you! Historic automobiles were made so that the seats could be rearranged to make a bed. Some were better suited to this than others. Nash made the most comfortable conversions, as did REO's Flying Cloud. Model T's were a little tighter due to their size. Side curtains can be made for an open touring car, and there are even descriptions of various hammock setups to use inside your car, some of which are non-invasive. There are also a variety of different tents that were designed to attach directly to the side of the car, incorporating it in the overall shelter design. Of course, you may not wish to install camping apparatus on your antique vehicle, so we'll focus mostly on additional (external) camping shelters. The most simple of all shelters is an oiled canvas tarp. If you're looking to camp on the cheap, I'd recommend picking up an oiled canvas grain truck tarp from your local farm supply store. A comfortable sized tarp should run less than $50. You'll also need some rope. Sisal is fine, but hemp is better and more historically correct. If you get a slightly larger tarp, you can lay half of the tarp on the ground as a vapor barrier and put your bedroll on top of that, then tie off the other half to a couple of trees or some sticks for uprights as an awning over your head in case of rain. This, with a reflector fire in the front will make a very comfortable and serviceable shelter under most conditions.

If you need more comfort, or are expecting inclement weather, you may opt for something larger and more private. The white canvas wedge and wall tents used by reenactors from all earlier time periods are acceptable for this purpose. Furthermore, small to medium sized marquis tents are often seen in photographs of the period. A decent wedge tent can be had for around $300 from a number of manufacturers, or used ones are usually available among online reenactor forums. These tents are what most early 20th Century reenactors use and are perfectly appropriate and well documented. I feel they need no further description here.


If you're looking for the ultimate 1920's "Home-Away-From-Home", the "Auto-Kamp" and Shattuck style trailers are pretty darn cool. I intend to build one of these someday and I will, of course, document the project here. In the meantime, we'll look at these neat little trailers! Basically, it's a small wooden trailer, usually on Model A wheels and axle, with a tailgate that lowers to make a step. On top of the trailer is a canvas tent that is quick and easy to set up and doesn't need to be staked down. These trailers came equipped with electric lighting that ran off of an adapter that plugged into the car's light socket. Some versions had special drawers in the bottom that operated as an icebox. Sometimes they had additional storage compartments for equipment. The whole tent folded neatly down into the trailer. Think of it as the very first "pop-up" campers! These trailers are pretty rare and finding one for sale is nearly impossible and the prices I've seen on a few of them have been outrageous! However, they are incredibly simple and a handy craftsman could probably build one in a couple of weekends. Material cost, depending on how accurate you try to build it, could range anywhere from $500-$2000.


This is probably as far as any of us will actually realistically go with historic RV's, but if you're really handy and creative, you could make a more luxurious camping trailer, or a "Camping Car" or "House Car" as motorized RV's were called at that time. They ranged from simple to extremely luxurious, much the way RV's do today.

1913 Earl Trailer


1923 Adams Trailer

2) Bedding:
The obvious choice for the "rough camper" is a simple bedroll as has been the choice of anyone on a campaign for thousands of years. A simple pair of wool blankets rolled tightly, with a ground cloth of painted canvas or vulcanized rubber will do nicely. I have had good experiences with painted canvas bedroll ground cloths from the Virginia Floor Cloth Company and for a good India rubberized canvas ground tarp, check out Jenkins and Company. (They make nice vulcanized India rubber raincoats too!)

Now, if you're reaching the age that sleeping on the ground has lost some of its charm, (I know I have...) there are some other options. The typical WWII-era army cot that most people are familiar with exists by this point. They actually were designed for WWI and after the war, most of the companies that made those goods began to market their surplus stock to the new sport camping industry. A typical wood-frame folding cot with white canvas (not green) will be perfectly correct for the period. These can still be had at many thrift shops, though you'll probably want to replace the covering as they are pretty much all dry-rotten.

For the ultimate in luxury, one of the new patented pneumatic rubber mattresses will serve nicely! (Yes! We are reenacting the era of air mattresses!) Here's the catch: 1920's air mattresses are different from modern ones and not reproduced. We all know how sketchy air mattresses can be and a 100-year-old one is worthless, even if you can find it. Personally, I find air mattresses to be unpleasant, slippery, and cold, however, if you want to use one, I recommend getting a black one that looks like India rubber. I also recommend covering it with ticking for your own comfort.

1923 Patent for Pneumatic Mattress
You can also use a tick stuffed with straw or leaves. I find this to be a hassle, particularly if you're setting up in different places each night and have to find stuffing material. I find the best option to be a folding cot with equal layers underneath and above for maximum warmth and comfort. While researching this article, I ran across a folding cot that is stored in a trunk. I think I'm going to have to explore this option a little further. Sounds interesting!

J.T. Thompson Trunk Bed
3) Camp Furniture
The experienced camper can survive without any camp furniture. A nearby rock or log can serve as a chair and one's lap as a table. However, the early 20th century was an era of excessive camping gear, so those of you who love camp furniture are in luck! There's nothing "farby" about having a ton of camp furniture. Folding wooden tables and folding, canvas-bottomed chairs are common as mud. In fact, many of the things that reenactors use in 18th century and 19th century reenacting were actually invented in the 20th century... This again, is a subject that I don't feel the need to delve too deeply into as it is nearly the same as all periods of reenacting before it. One thing though, that seems pervasive throughout the period though is the recycling of old soap boxes into usable furniture. in the 1923 book "Motor Camping" by Melville Ferguson, he mentions making extra seating, bookshelves, spice racks, and many other useful things out of old wooden soap boxes. Of course, wooden soap boxes are collectible themselves nowadays, but if you are clever about scouring the antique malls and junk stores, you just might luck into a few that were previously "recycled" which makes them less desirable to collectors and therefore, cheaper! Another cheap and very historically accurate solution is to find the old wooden style folding chairs that many fraternal lodges and older churches used for the better part of the last century. These chairs are well-documented in camping photographs and can be picked up at flea markets and yard sales for $10-$20 a piece.

Remember, don't pack more furniture than you can safely haul!
4) The Kitchen

A decent portion of your time recreating any historical time period is in food prep and cooking. The early 20th Century is no different, though there are a few handy upgrades that you can use. For one thing, enamelware or aluminum dishes were very popular. This is an improvement over the weight and fragility of stoneware, or the unhygienic wooden trenchers. *NOTE: Aluminum has recently been linked to an increased risk of Alzheimer's Syndrome, so perhaps enamelware is the best choice. It's also affordable and easy to find anywhere.* For really nice, historically accurate reproduction enamelware and splatterware, check out Crow Canyon. You may want to invest in a few enamelware pots as well, since they are lighter than cast iron. However, if you plan to cook directly over a fire, cast iron is your better choice because it's thicker and regulates heat better.

The first thing you should probably come up with is a camp kitchen. This is a throwback from the "chuckwagon box" of the late 19th Century. It is meant to hold all the cooking implements, dishes, spices, and other sundry kitchen items. Traditionally these were usually mounted on the running boards, but they also could be found on bumpers, in tricks, and sometimes even mounted in the form of a drawer underneath a truck or trailer. Some trailers had a special built compartment in the nose for a kitchen "closet". You could easily build one and there are plans all over the internet. While wood is acceptable, many of the ones I've read about were galvanized steel and sealed with plumbing solder so that they would be impervious to water when riding on the running board of the car. The important thing is to make sure it's sealed.

After coming up with your box, you'll know how much room you'll have to fill, thus placing a limit on the gear you can acquire/pack. Of course, you can also gather your gear, and then make a purpose-built box for it, but I find that many people are more likely to make something far too big and heavy when they do that. Also, if you are actually using an historic automobile, make sure the box will fit on your running board!
5) FIRE! For heat, cooking, and light:

There are actually quite a few options for early 20th Century campers. Of course, there's nothing like sitting around the campfire after dark with your companions and a bottle of... well... erm... a bottle of Canadian Snakebite Cure! (That is if your time-period of choice falls between 1919 and 1933!) Unless you're in an area where fires are banned (and that's historically accurate as well. Many National Parks in the 19-teens and 20's had wholesale fire bans.) you'll probably have a campfire for fun at least. Now you can certainly use this to cook! The drawback of using such a heat device is that all your pots and pans get covered in soot. This isn't a big deal if you wrap them in canvas bags before packing them away. Another couple of drawbacks are crouching while cooking and getting smoke in your eyes! So, let's look at the "modern" alternatives!

This is the Prentiss Model 10. It is a basic, single-burner gasoline stove. I believe these are also available for Coleman-style fuels as well. These can be had in varying degrees of condition for around $100. It is highly recommended by books of the period.


Another strongly recommended gasoline stove is the Kamp Kook. Several books mention its value and quality. These have anywhere from 2-3 burners and have often been converted to propane. Look for those, because they're safer to use and collectors aren't as interested!

Small, portable wood-fired stoves were also popular. These were easy to work with, lightweight, fuel was usually free, and they were far more dependable than the gasoline stoves. Fortunately for us, Cabela's carries a little stove that is pretty much perfect for this purpose and almost exactly matches images from the period of similar stoves! Just goes to show that a perfect design is good for 100 years, no problem!

If you have room in your camping vehicle, one of these portable kerosene heaters is an excellent choice, especially in colder weather. It produces plenty of heat for warmth, but also the top of the heater is designed to be used as a stove. A skillet fits nicely and will cook bacon and eggs perfectly without needing adjustments. The drawback is their size and the additional bulk of having to carry kerosene. It burns at a rate of about a gallon every 8 hours, or 3 gallons a day if used constantly. They are readily available for around $25-$50 and new wicks are available online. *NOTE: When shopping for a heater like this, be sure to check the tank. They are susceptible to rusting out and even a pinhole will render it unusable.*

For lighting, there are many options. The simplest light is a candle in a lantern. Because of the rough roads of the period, glass was likely to break, so lanterns were usually fitted with mica that was much stronger than glass. The lantern pictured above was very popular and is a civilian version of lanterns made for WWI. After the war, these were marketed to campers.

Another simple light is the newly invented flashlight! These ran off two or three D-cell batteries. They can usually be picked up on eBay for around $10-$20 and replacement bulbs are easy to come by. They take modern batteries. Be careful not to break the glass though.

Another easy-to-acquire period light is the Deitz Lantern. These are still available, brand new, from the factory in catalogs such as Lehman's or the Cumberland General Store. You can also find serviceable knock-offs made overseas for around $10. The nicer ones work a little better though. They can burn paraffin oil which is cleaner and available at most big box stores, or kerosene, which is often available at rural gas stations.

For a major improvement in light quality, consider the newfangled Coleman lantern. These lanterns are extremely bright, however, the mantles are very fragile, so stock up on extras and expect to replace them every camp.


Another very bright light is the carbide lamp. Though they are awesome, carbide is getting a little harder to find, so this may not be the most desirable choice.

On the level of interesting, but probably impractical, this is an electric lamp that burns carbon sticks as filament. It plugs into the headlight bulb socket on your automobile. Nifty, but probably not the best choice for the active reenactor and certainly not good for your car's battery.
6) Cooling:
Reenactors of earlier time periods have often had to go to battle with the problem of keeping food safe and cool versus being historically accurate. After a weekend of eating salted fish at a Revolutionary War camp, I began this battle myself. Many of us over the years have found clever ways to hide coolers. For this period, you don't really have to! Coolers existed! (Of a sort) Many were simply iceboxes. Often a camping trailer or house car might have a built-in icebox. Ice was readily available in most towns across the country, usually in the form of blocks. For those who didn't have such luxury, there were portable options.
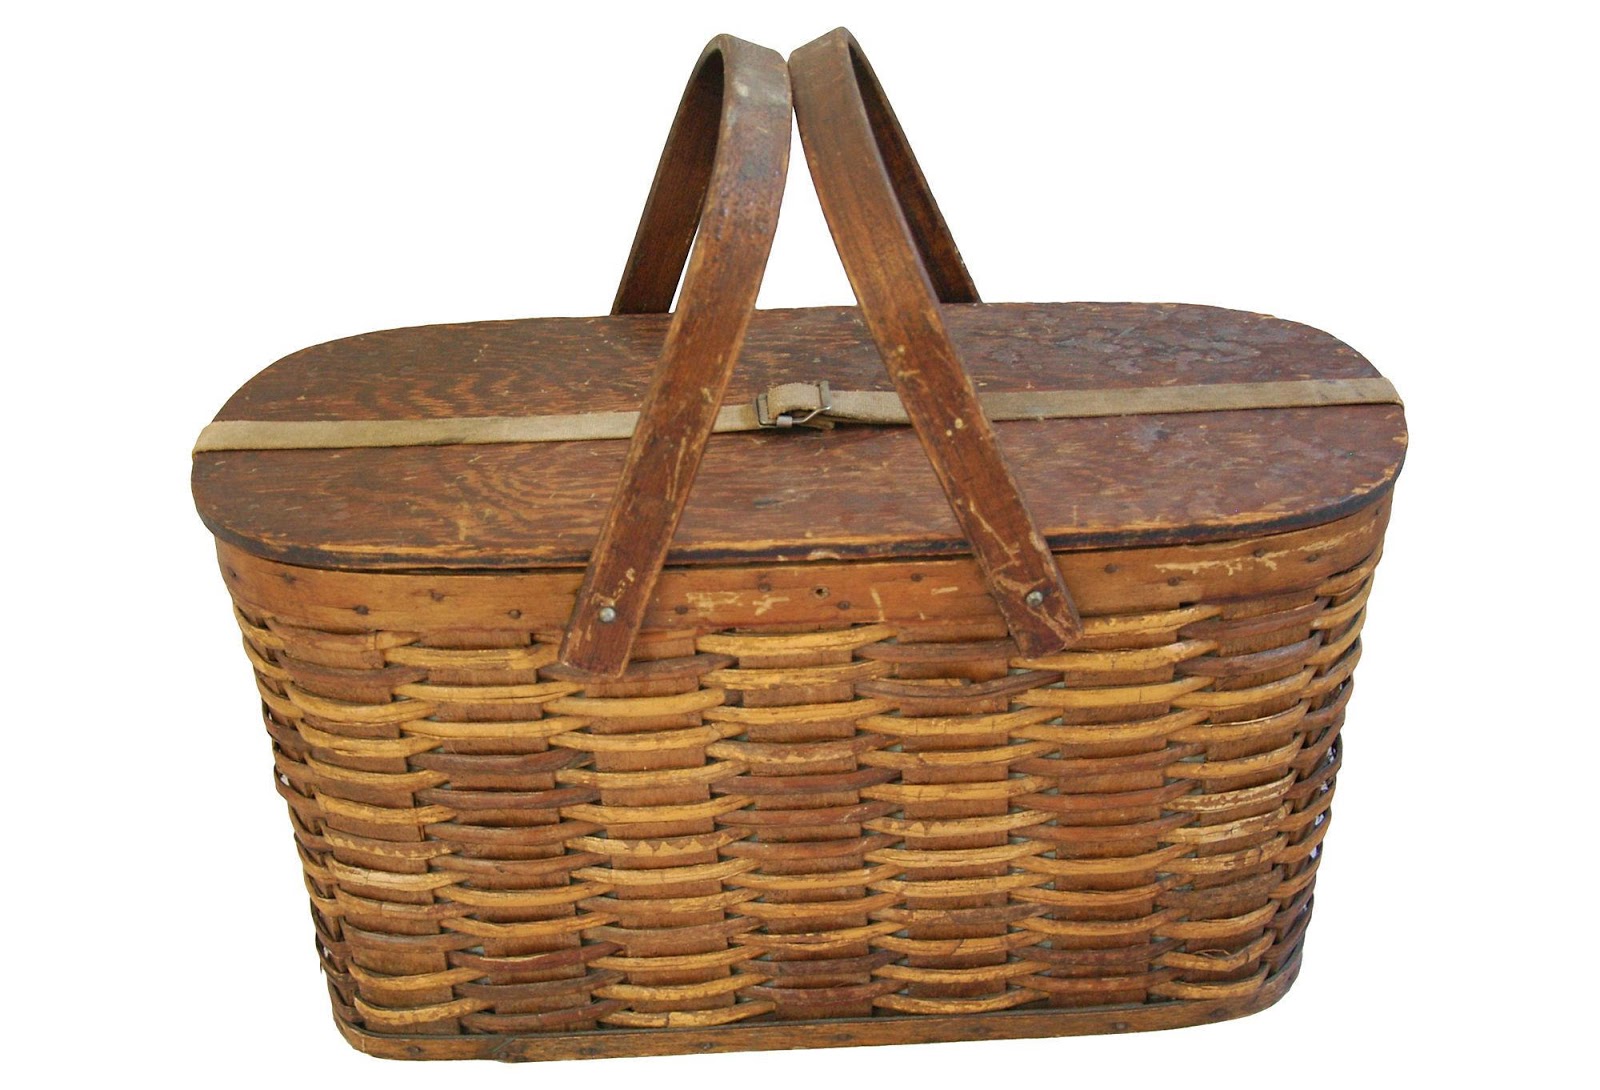

Pictured above is the Hawkeye Refrigerated Picnic Basket. The ice block fit in the smaller compartment and kept everything in the basket nice and cold. Since it was separated from the food compartment, when the ice melted, it didn't soak everything in the cooler. Genius, no?

This is an Evaporative Auto Refrigerator. It has a metal box on the inside, and a flax canvas bag surrounding it. When the bag is filled with water, the box is strapped to the running board of the car. As you drive, the evaporative process chills the water, which in turn chills the inside of the metal box. No ice needed!

Along the same vein, the water bag works the same way. By attaching it to the front of your car, it not only cools the water through evaporation, but it also keeps your radiator colder as it will suck in cool to offset a warm outside temperature. After a few hours of the road, you'll have nice, cold canvas-flavored water to drink!
I think this covers most of the basics. Of course, there's a myriad of sundries such as personal items/toiletries, weapons, sporting equipment, music, and much, much more, but if you pay attention to the above basics first, you'll be pretty well set for your first motor camp!