
Over the past weekend some friends and I went motor camping and the weather was less-than-perfect. Sometimes all you can do is hole up in a warm tent and eat lots of good stuff! Today I intend to explore some of those recipes as well as a few others that are great, and one that is far less desirable.

It was cold and wet, so we spent a lot of time eating and socializing in the warm mess tent!

Good times and good food go very well together! Keep your crew happy with good eats!
The early 20th Century brought with it lots of changes in food. Pre-packaged, commercially processed foods were the latest craze and would set the tone for the next 100 years. When they first started, packaged foods were slightly more wholesome than they are now. However, later on, short shelf lives led to the addition of more preservatives and processes changed to the point that today, many products are barely recognizable as food. One of these products that we chose to reproduce were "Cheez-It's". Originally invented in 1921, they hit the market in 1922, produced by the snack manufacturers, Green and Green Bakers. They were an immediate hit. Later on, the recipe was sold to Kellogg who produces it under the "Sunshine" snack brand to this day. Here is the recipe we used. (Note: These were made at home prior to the camp.)

Original 1922 Cheez-It packaging
"Cheez-It Crackers"
"A Baked Rarebit"
"A Baked Rarebit"
1/2 Lb Extra-Sharp Cheddar Cheese
1/4 Cup Butter
1 Teaspoon Kosher Salt
1 Cup Flour
2 or 3 Tablespoons Ice Water
1/4 Cup Butter
1 Teaspoon Kosher Salt
1 Cup Flour
2 or 3 Tablespoons Ice Water
Grate cheese. Mix well with butter and salt. (Make sure the butter is at room temperature. I recommend using an electric mixer, as it's hard to get it all properly mixed by hand.) Add flour. Continue mixing until mixture is "pebbly". You'll know what this means when you see it. Slowly add 2 tablespoons of ice water while forming mixture into a ball. Use a little more water as needed until you can form a dough that isn't crumbly. Dough should be smooth. For a completely period approach, you can wrap dough in a lightly dampened towel and place it in your icebox or monitor top refrigerator. The modern solution is to wrap it in plastic wrap and refrigerate. Either way, chill the dough for 1 hour. After chilling, roll the dough out about 1/8" thick. The thinner it is, the crispier they will be, but the less time they'll take to bake. Cut dough into 1" squares. This is probably the most time-consuming part. You can use a butter knife, pizza cutter, or pastry cutter to accomplish this. Perfection is not necessary. For the perfect "look", use an ice pick to poke a hole in the center. If you don't care about them rising a little more or having unsightly bubbles, then don't bother with this additional time-consuming process. Place on a baking sheet (there's no need to grease it because they have a ton of fat that keeps them from sticking) and bake for 15-17 minutes as 375 degrees. Allow to cool and enjoy! I recommend at least doubling this recipe. I made a triple batch and about a half dozen people demolished them in about 2 hours. They are incredibly good.

This is what I mean by "pebbly".

This is about the consistency you want the dough to be before chilling.

Freshly baked!

I keep them in a small tin, but eventually I might try to reproduce the above box!
There are a plethora of old cookbooks from the 19-teens and twenties. It seems that nearly everyone from big name chefs, to passenger railroad and ship lines, to church and civil organizations were producing various cookbooks. These can be found both as originals and re-prints online just about everywhere. I have a few and they have supplied me with endless recipes to try. One of my favorite recipe books is "A Thousand Ways To Please A Husband", published in 1917. (Yes, it's just a cookbook!) The book is written for newlywed housewives and features recipes for a complete meal with a situational story leading to the recipes. It covers a year's worth of seasonal recipes. I highly recommend this cookbook! The recipes are spot on and easy to follow. One caveat though, is that being written in 1917, there are few references to modern equipment. Recipes may say to "bake in a quick oven" or "place over fire" with the assumption that you, the housewife, will know what these things mean. I have had to convert a lot of this for my "man brain", into modern equivalents. Generally if baking breads, you'll want a "quick oven", which is anything over 400 degrees. For hard outer crusts and soft centers, up it to about 500 degrees. For most other things, about 350 degrees is acceptable.

Antique and reproduction cookbooks are your best source for period recipes, however, camping books and BSA handbooks have a lot of great camping-related offerings as well. There are a lot of recipes that are digitized online as well.
This leads us to my next recipe selection, which is for biscuits and sawmill gravy! This was a popular Southern dish in america and was as common for breakfast as for dinner. Sawmill gravy gets its name from the massive logging camps in America, post-Civil War. I have been unable to find an actual recipe for sawmill gravy, but hundreds of references to it, usually accompanying a recipe for biscuits and the directions are frequently, "make gravy in the usual way". Therefore, I have used a recipe for sawmill gravy that has been handed down through my wife's family for generations. I think it is acceptably "the usual way." The biscuit recipe is from "A Thousand Ways to Please a Husband". It is called "Emergency Biscuits", because it takes very little effort or prep work to make them as they are just a drop biscuit, however, they are incredibly good. The simple effort and limited ingredients make them absolutely perfect for motor camping. At our camp, we ended up using whole wheat flour, because that's what we had. I don't recommend this, because it makes the biscuits and gravy really heavy. They are quite filling, so if you have a lot of hard-working men in a logging camp to feed, then maybe whole wheat is the way to go, however, whole wheat flour was almost gone as a product by the 1920's. I recommend all-purpose flour. Do not use self-rising flour!
Emergency Biscuit
2 Cups Flour
1/2 Teaspoon Salt
4 Teaspoons Baking Powder
3 Tablespoons Fat (Lard or Butter)
7/8 Cup Milk
Mix dry ingredients and cut in fat. Add the milk. (Add a little more milk if needed to get a good, sticky consistency. You want them to have to be shoved off of a spoon) Drop by spoonfuls on a buttered pan, placing 1" apart. Bake 12 minutes in a hot oven. (I baked mine 15 minutes in a 1908 Boss range-top oven that I heated with propane. Temperature range was 400-425. This recipe makes about 14 small biscuits. You'll need at least a triple batch to go along with the gallon of gravy in the next recipe.)

The 1908 Boss Range-top Oven. Since I don't have a kerosene stove, I had to opt for propane, which is not period, but not very intrusive upon the period atmosphere.

Finished biscuits!
Sawmill Gravy
1 Lb of Sausage (You can use any sausage. You can also use 2 lbs for meatier gravy.)
2 Cups of Flour
1 Gallon of Milk
3 Teaspoons of Salt and Pepper.
(This makes a lot of gravy, so consider cutting it in half for a smaller group.) Fry sausage in a skillet. Add flour and brown slightly in the grease, giving the sausage a good coating of flour as well. Add salt and pepper. (I used 1 1/2 teaspoons of each, but basically to taste.) Put this mixture in a large pot and add the milk. Stir constantly on low heat until it thickens. (Note, this will take a very long time. I recommend having a helper stir while you make biscuits. You must stir constantly to avoid lumps in your gravy.)

Frying the sausage for gravy. Don't drain the grease off! You need it for your gravy base!
Another great breakfast item at camp is flapjacks! They are frequently mentioned in camping and motoring books of the period, and I can certainly see why! They are incredibly easy, require few materials, and are very tasty! I searched through several recipes to find something that was simple. Now, you can use a pre-made dry pancake mix. Pillsbury Pancake Flour hit the markets in the early 19-teens. "Bisquick" was first marketed in 1930. However, I have tried both at camp and determined that the following recipe is not only cheaper and tastier, but actually just as easy to use! Unlike many other recipes, it does not require milk, so the only "wet" ingredients you need are eggs and the water you already have for camp needs. I highly recommend this recipe, whether you make it at camp, or mix up the dry ingredients ahead of time for ease of preparing. This recipe comes from a 1927 cookbook, titled, "My Most Successful Recipes" by Lulu Thompson Silvernail. I have made these many times at camp and at home and they never fail to please.


1920 ad for Pillsbury's Pancake Flour
Water Batter Cakes
1 Egg
1 Cup Water
1 3/4 Cups Flour
1/2 Teaspoon Salt
1 Tablespoon Sugar
2 Teaspoons Baking Powder
2 Teaspoons Melted Butter
Beat egg light, to which add water. Sift flour, salt, sugar, and baking powder together and add to wet mixture. Melt butter and add, beating mixture hard for one minute. Bake on soapstone griddle or slightly greased ordinary griddle. (Note, I have never used a soapstone griddle. Sounds like it might be tricky to take camping for fear of breaking it. Also, an ordinary cast iron griddle is heavy and bulky. I have had absolutely no problem cooking these on a sheet-steel skillet or an enamelware skillet, however, be sure to reduce your heat a little. Low, consistent heat works best for flapjacks and grilled cheese sandwiches!) I recommend serving these with maple syrup and some fried rashers of bacon or ham.

Rashers of bacon or ham add nicely to any breakfast, or other meals for that matter!
Now that we've covered snacks and breakfast, let's talk about other meals. Most of the motor camping books of the period recommend eating a very heavy breakfast, snacking through lunch (because you're driving) and eating a good, wholesome dinner. In Long and Long's 1923 book, "Motor Camping", they recommend adopting the "Indian" method of eating two large meals a day, morning and night, and then eating smaller sustaining snacks throughout the day. "Such a meal consisting of one or two eggs or cottage cheese, a few nuts, whole wheat bread, olives, lettuce, radishes, tomatoes, apples, pears, or peaches, with some dates or raisins, will supply the body's needs and have as sustaining qualities as meats and rich desserts."
For the end of the day, here's a good hearty soup that can be enhanced to make a full meal. One-pot meals are really ideal for camping. This recipe comes from Lulu Thompson Silvernail's 1927 cookbook, "My Most Successful Recipes".
Cream of Potato Soup
3 Medium Potatoes
3 1/2 Cups of Rich Milk (Use whole milk)
1 Tablespoon Flour (Thickening agent)
3 Tablespoons Butter
2 Tablespoons Grated Onion
1 Teaspoon Salt
1/8 Teaspoon White Pepper
Dash of Cayenne Pepper
2 Tablespoons finely chopped Celery Hearts
Peel and boil potatoes until tender and run through a siene into a saucepan. (Or you can just mash them really, really well) Add milk to potatoes. Mix flour, butter, grated onion, salt, peppers, and celery together and add. (Note, celery and onion should be very fine and cooked tender) Place over fire and cook slowly until mixture thickens, stirring constantly. (Note, to make this soup into a whole meal, include a cup of chopped ham halfway through cooking, and serve with a good soda bread, corn bread, or biscuits.)
Some of my cookbooks are modern re-prints, while others are fragile originals, so for taking into the field, I opt to write out my recipes on period style recipe cards. This way, if they get ruined by grease or liquid, I haven't damaged my book and it keeps the appearance of my camp kitchen looking nice and historically accurate. I also try to make an effort to re-package all of my materials in period wrappings such as waxed paper, kraft paper, or glass bottles.

Write recipes on cards to take camping. Don't risk damaging a whole book around grease, liquid, wind, fire, and mud!

Packaging your foodstuffs properly makes a big difference and keeps the camp looking nice while you cook!
In addition to great foods such as the ones listed above, there are many processed foods that can be added to your camp supplies. Tin cans of peaches, succotash, and even certain Campbell's soups can be re-labeled with printable period labels and used as they are. Google is an excellent resource for finding printable labels.

Printable can labels are available all over the internet. A simple Google search will reveal plenty of options.
I like to keep my cold food supplies in a Hawkeye Refrigerator Basket. These can be acquired relatively affordably at antique stores and on eBay. They are great for a period-correct cooler and most are in excellent usable shape because they were so well built to begin with. They were patented pretty early, so they're appropriate for pretty much everything we do. I have one that's a full-size picnic basket, and another one that is narrower and designed to fit on a car's running board.

Hawkeye Refrigerator Baskets are the perfect period-correct cooler!
Now that we have your mouth fully watering and your stomach rumbling, here is the antidote! This recipe is for a wildly popular dish in the teens and twenties, though for the life of me, I can't imagine why... This is sure to ruin your appetite! This one comes from "A Thousand Ways To Please A Husband", which might need to be re-named to "999 ways to please a husband" for the fact that this recipe is included... Here is the inappropriately-named "Perfection Salad"!
Perfection Salad
1 Tablespoon Granulated Gelatin (Unflavored Jell-O)
4 Tablespoons Cold Water
4 Tablespoons Vinegar
1 Tablespoon Lemon Juice
1 Cup Boiling Water
4 Tablespoons Sugar
1/2 Teaspoon Salt
2/3 Cup Diced Celery
1/2 Cup Shredded Cabbage
1 Green Pepper, chopped
2 Tablespoons Pimento, Cut Fine
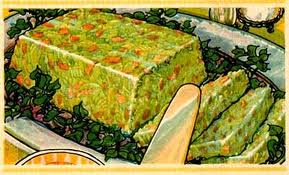
That's a wiggly lump of NOPE!
I hope you enjoy these recipes and I wish you the best if you try "Perfection Salad". I'd love to hear about your recipes that you've tried as well!
Happy Motoring!!

Happy Motoring!!

No comments:
Post a Comment